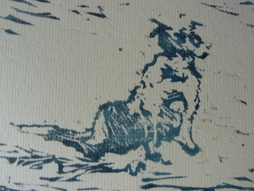
That's a drypoint printing plate, above- drawn on the spot. To read more on them, have a look further down the page.
Printmaking happens. From finger-prints on a hard-boiled egg, to footprints and tyre marks trailing from a puddle on the ground; it's going to happen. Because of that, the variety you can get is more or less limitless, and often very beautiful. I read a book about art when I was a kid, and one of the stranger techinques written about was fish-printing, where you take a fish, slap it in paint and plop it on the paper: disgusting! If you like fish as creatures, it's not very nice to do, if you like them as food, it seems a waste. If you don't, why do it? Revolting- yes- but also rather lovely to look at. No, I never did one and am not going to be doing any, either, but it shows you what you can do just by taking an object with an interesting surface, and printing from it. I talked to a detective, who was probably not very into "art", but he was full of admiration for the human fingerprint, and lectured each person he took the prints of about what a wonderful thing a fingerprint is. It is. Have a look at your fingers, if you have any, or your toes or your lips if you don't- lipstick kisses are another famous kind of printing, but again, not something that I do, myself.
This is a bit about printmaking from my perspective as someone who likes printing, but who can't claim any special authority on it. Although I waffle on, it's not meant to be for experts, but for anyone who's interested and would maybe even like to have a go. I will be doing a series of videos on making different kinds of prints.
Kinds of Printmaking
There are several well-known kinds of printmaking, and zillions of possibilities within them. Printing from one kid of wood will be different to using another kind.
Think of a flat surface. You can put ink, etc, on it, and paper on top, and transfer the one to the other. This is planar printing, and you get it in monoprinting, offset lithography, etc. I think silkscreen (serigraphy) and lithography count as planar printing, but nobody would normally bother to label them like that, and litho does often involve some etching away of the surface.
You can also remove some of that surface, making it into a landscape of valleys and hills, and then either applying ink or whatever to the high peaks- relief printing, like linocut or woodcut or down into the grooves- intaglio printing, like drypoint, etching, etc. You can combine that by building up the surface- collography, and these techniques are often combined.
Advantages of Making a Plate
By having this flat surface (the plate), with these marks made on it, you can potentially print the same or similar images numerous times. Whilst you might cook up a watercolour painting in an afternoon, a plate might take longer to prepare, but you might make 100 prints from it in a few days. The nice thing is that you can vary printing so much. You might do your first print in black ink; your second in dark blue, and your third in a different colour. You might do your next one on a different colour and type of paper, and the one after onto some fabric. I could go on and on...
Materials
What's nice is that your print will often reflect the material your plate is made of. A wooden plate may show the grain of the wood, a stone one, the characteristics of the stone. Each technique has its own character, and its own beauty. If you're like me, you'll find that you work in a very different way with a different material. Get an ordinary pencil and draw on smooth paper, canvas, and sandpaper, draw in emulsion paint mixed with sand, draw on paper covered in oil ( but keep it away from your other work, or it will ruin it). Each surface makes you respond in a different way. You'll find you can do different things with each one. It's the same with printing.
Two kinds of Printmaking Processes
Start with a raw potato. Cut it in half, as straight as you can. You have 2 options: you can cut bits away- say the letter N. Remember it will come out the other-way-round. Slice out two triangles and the sides, but not your fingers. Have a bit of watercolour paint or some ink on a kitchen plate- dip the potato in it- press it down onto some paper- do that several times without going back for more ink and you'll discover a lot. Do you need a thinner layer of ink? Perhaps you need to cut it out a bit deeper. Potato prints can be surprisingly beautiful. You can plant the potato afterwards too, if you haven't skinned it. That's the first way. The second is to take something thin and sharp, like a nail or scalpel, and scratch into the potato. Rub ink into the cracks and wipe the surface cleanish. Press the potato down hard onto some paper, and you may have a different kind of print, with the ink coming out of the cracks as you press it. Go wild and use two colours. See if you can combine the two techniques. Those two ways form the basis of a lot of printing- woodcuts, lino cuts, and others following the first method; and etching, engraving, drypoint and others using the second. Most involve cutting or scratching into the surface. Etching involves using chemicals to eat away the marks you want.
Woodcuts
Why do I like woodcuts? I enjoy working with wood, for starters. I like the fact that they have been done for many, many years, and whilst they can have a flavour of something antique, woodcuts are tremendously adaptable. They don't need to be black and white either. Henri Riviere did woodcuts with 50 colours in them. They can be as big as your piece of wood and paper are. Woodcuts are also do-able without having all kinds of amazing resources. If you have wood, something to cut it with, some printing ink, some paper and probably a roller, then you have what you need to get printing. You can do so without a press and without more space than a table or floor.
Different Woods
As I said, I like using wood. You can find bits of it on the beach or thrown away here or there, or make use of old furniture. You'll find that any mark scratched or cut into the wood may print. Boxwood will cut very differently to pine. Plywood can work well. Fibreboard may tear. MDF can cut smooth, but I tend not to use it. Horrible stuff. Enough to say that if the wood is very smooth and hard, it will be great for doing detailed work. If it's coarse, it's probably better for larger or cruder work. The grain of the wood can be a real feature of the piece. I it's real wood, not mashed up and glued together again, it will have a grain of some kind, and you will find yourself either using it, or battling with it.
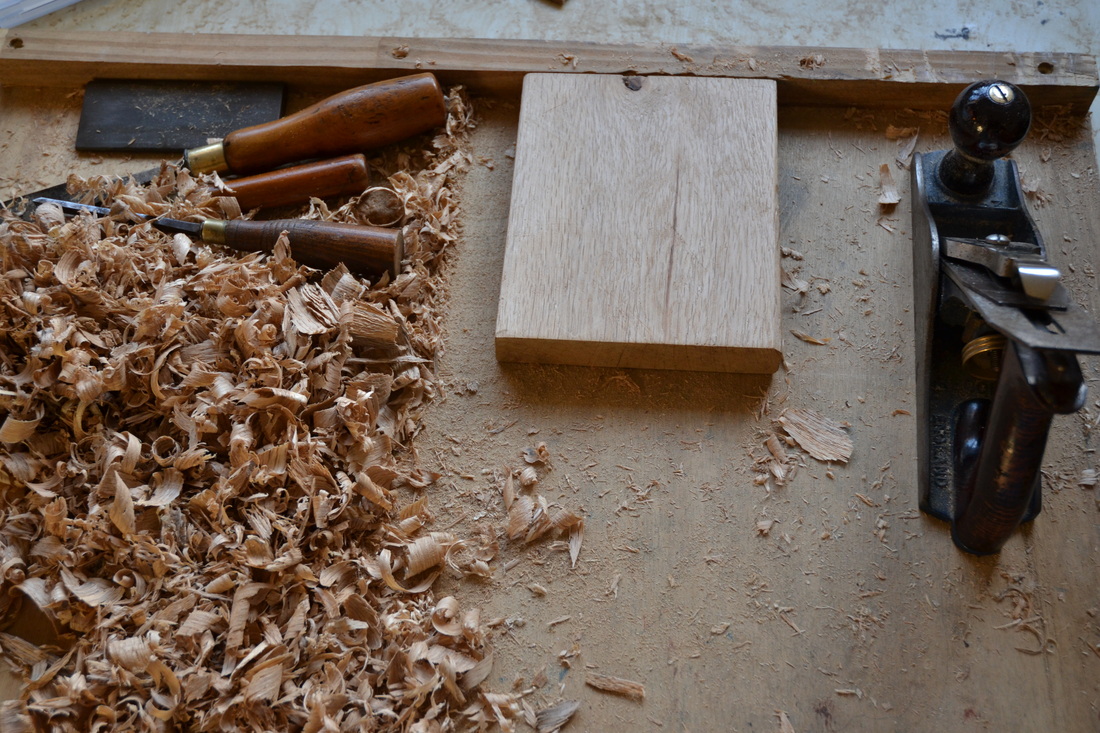
Tools
You can use lino-cutting tools. I tend to use woodcarving chisels, as I have some nice old ones that feel lovely to use, and because I used to do a bit of woodcarving. For woodcuts I generally push or pull the chisels around by hand, but sometimes use a mallet. You can, of course, use anything that will take pieces out of the wood. In the absence of woodworking tools or lino ones, you could use a knife, an old nail or bradawl or something- just be careful. Different tools will make different marks, but you can get a great variety of marks out of one tool. I have a small gouge that used head-on works like a spoon in ice-cream, but it can be held vertically- almost like a pencil- and drawn sideways towards one to give really fine lines. It can make long lines or little dimples. Learning to get the most out of a tool without ruining it is a real pleasure. You could hammer a nail in to make a picture of dots. You could presumably dent the wood or use dremmels and other power tools to remove areas. Maybe that's the modern way, but it's not my kind of thing. A pyrography iron could be used to burn areas back- there's so much that can be done. I'm happy to stick with the woodcarving tools, myself. One thing worth saying is that- if you're not dropping them on your toes and if you're using them properly, you are more likely to wound yourself trying to use a blunt tool than a sharp one. A blunt one is quite likely to skid, and you use more pressure to make the mark, and so on. Keep them sharp, and stop if you're getting tired. I made myself a rule when I was a teenager, when I was stone-carving, that after I had banged the hand holding the chisel, it was time to stop. As you get more skillful, you stop hitting your fingers, which is nice- but the rule is generally a good one for the sake of your picture, if not your digits.
How it Works
In a typical woodcut, the hills take the ink, and the valleys are made deep enough not to print. Usually you'll roll the ink over the top of the sheet of wood. The thinner the layer of ink, the less will go into the valleys. Printing ink tends to be much thicker than the kind of ink you have in a bottle for drawing with. More like Marmite or maybe one of those pates you get in squeezy tubes. I've used etching and litho inks quite happily. Some of my best woodcuts were inked with acrylic screenprinting ink, though that doesn't roll out so nicely. If you're going to print in a dark ink on a lighter background, remember that as you carve away at the wood, you are removing what will be light, and leaving what will be dark. One of my tutors, Simon Packard, did enormous woodcuts of animals. He taught me to go out and draw on the wood, and then cut round my drawing lines. That gives the woodcut a real feeling of life, though you'll be amazed at how much your lines curl around, and what a faff it is to follow them- but it's worth it. You can, of course, draw straight-off with your cutting tools. That's fun, and you'll get a very different look to the print- probably a lot more straight lines. Bear in mind that, unless you are very clever, or have an offset litho press handy, your print will be back-to-front. Not so important if you're doing a bird or a sausage or a flower or something, but if you're doing a street scene or map or anything with writing in it, you may want to think about it.
So your plate is cut, you've rolled the ink on. You position your paper where you want it (an art in itself). If you have a press, print away. If not, use a rounded object that isn't going to make holes in the paper and carefully rub the back of the paper with it. A metal spoon works well but will burn your fingers. I turned myself a nice wooden thing to do this on the pole lathe some years ago. In my mind the printing of it is the hardest thing to get right in the whole process. The paper slithers off or gets buckled. Do start with bits of paper that aren't so precious, and take your time- wash your hands well, etc. Be careful when peeling the paper off not to ruin the whole thing by letting it drag against the inky wood!
Printmaking happens. From finger-prints on a hard-boiled egg, to footprints and tyre marks trailing from a puddle on the ground; it's going to happen. Because of that, the variety you can get is more or less limitless, and often very beautiful. I read a book about art when I was a kid, and one of the stranger techinques written about was fish-printing, where you take a fish, slap it in paint and plop it on the paper: disgusting! If you like fish as creatures, it's not very nice to do, if you like them as food, it seems a waste. If you don't, why do it? Revolting- yes- but also rather lovely to look at. No, I never did one and am not going to be doing any, either, but it shows you what you can do just by taking an object with an interesting surface, and printing from it. I talked to a detective, who was probably not very into "art", but he was full of admiration for the human fingerprint, and lectured each person he took the prints of about what a wonderful thing a fingerprint is. It is. Have a look at your fingers, if you have any, or your toes or your lips if you don't- lipstick kisses are another famous kind of printing, but again, not something that I do, myself.
This is a bit about printmaking from my perspective as someone who likes printing, but who can't claim any special authority on it. Although I waffle on, it's not meant to be for experts, but for anyone who's interested and would maybe even like to have a go. I will be doing a series of videos on making different kinds of prints.
Kinds of Printmaking
There are several well-known kinds of printmaking, and zillions of possibilities within them. Printing from one kid of wood will be different to using another kind.
Think of a flat surface. You can put ink, etc, on it, and paper on top, and transfer the one to the other. This is planar printing, and you get it in monoprinting, offset lithography, etc. I think silkscreen (serigraphy) and lithography count as planar printing, but nobody would normally bother to label them like that, and litho does often involve some etching away of the surface.
You can also remove some of that surface, making it into a landscape of valleys and hills, and then either applying ink or whatever to the high peaks- relief printing, like linocut or woodcut or down into the grooves- intaglio printing, like drypoint, etching, etc. You can combine that by building up the surface- collography, and these techniques are often combined.
Advantages of Making a Plate
By having this flat surface (the plate), with these marks made on it, you can potentially print the same or similar images numerous times. Whilst you might cook up a watercolour painting in an afternoon, a plate might take longer to prepare, but you might make 100 prints from it in a few days. The nice thing is that you can vary printing so much. You might do your first print in black ink; your second in dark blue, and your third in a different colour. You might do your next one on a different colour and type of paper, and the one after onto some fabric. I could go on and on...
Materials
What's nice is that your print will often reflect the material your plate is made of. A wooden plate may show the grain of the wood, a stone one, the characteristics of the stone. Each technique has its own character, and its own beauty. If you're like me, you'll find that you work in a very different way with a different material. Get an ordinary pencil and draw on smooth paper, canvas, and sandpaper, draw in emulsion paint mixed with sand, draw on paper covered in oil ( but keep it away from your other work, or it will ruin it). Each surface makes you respond in a different way. You'll find you can do different things with each one. It's the same with printing.
Two kinds of Printmaking Processes
Start with a raw potato. Cut it in half, as straight as you can. You have 2 options: you can cut bits away- say the letter N. Remember it will come out the other-way-round. Slice out two triangles and the sides, but not your fingers. Have a bit of watercolour paint or some ink on a kitchen plate- dip the potato in it- press it down onto some paper- do that several times without going back for more ink and you'll discover a lot. Do you need a thinner layer of ink? Perhaps you need to cut it out a bit deeper. Potato prints can be surprisingly beautiful. You can plant the potato afterwards too, if you haven't skinned it. That's the first way. The second is to take something thin and sharp, like a nail or scalpel, and scratch into the potato. Rub ink into the cracks and wipe the surface cleanish. Press the potato down hard onto some paper, and you may have a different kind of print, with the ink coming out of the cracks as you press it. Go wild and use two colours. See if you can combine the two techniques. Those two ways form the basis of a lot of printing- woodcuts, lino cuts, and others following the first method; and etching, engraving, drypoint and others using the second. Most involve cutting or scratching into the surface. Etching involves using chemicals to eat away the marks you want.
Woodcuts
Why do I like woodcuts? I enjoy working with wood, for starters. I like the fact that they have been done for many, many years, and whilst they can have a flavour of something antique, woodcuts are tremendously adaptable. They don't need to be black and white either. Henri Riviere did woodcuts with 50 colours in them. They can be as big as your piece of wood and paper are. Woodcuts are also do-able without having all kinds of amazing resources. If you have wood, something to cut it with, some printing ink, some paper and probably a roller, then you have what you need to get printing. You can do so without a press and without more space than a table or floor.
Different Woods
As I said, I like using wood. You can find bits of it on the beach or thrown away here or there, or make use of old furniture. You'll find that any mark scratched or cut into the wood may print. Boxwood will cut very differently to pine. Plywood can work well. Fibreboard may tear. MDF can cut smooth, but I tend not to use it. Horrible stuff. Enough to say that if the wood is very smooth and hard, it will be great for doing detailed work. If it's coarse, it's probably better for larger or cruder work. The grain of the wood can be a real feature of the piece. I it's real wood, not mashed up and glued together again, it will have a grain of some kind, and you will find yourself either using it, or battling with it.
Tools
You can use lino-cutting tools. I tend to use woodcarving chisels, as I have some nice old ones that feel lovely to use, and because I used to do a bit of woodcarving. For woodcuts I generally push or pull the chisels around by hand, but sometimes use a mallet. You can, of course, use anything that will take pieces out of the wood. In the absence of woodworking tools or lino ones, you could use a knife, an old nail or bradawl or something- just be careful. Different tools will make different marks, but you can get a great variety of marks out of one tool. I have a small gouge that used head-on works like a spoon in ice-cream, but it can be held vertically- almost like a pencil- and drawn sideways towards one to give really fine lines. It can make long lines or little dimples. Learning to get the most out of a tool without ruining it is a real pleasure. You could hammer a nail in to make a picture of dots. You could presumably dent the wood or use dremmels and other power tools to remove areas. Maybe that's the modern way, but it's not my kind of thing. A pyrography iron could be used to burn areas back- there's so much that can be done. I'm happy to stick with the woodcarving tools, myself. One thing worth saying is that- if you're not dropping them on your toes and if you're using them properly, you are more likely to wound yourself trying to use a blunt tool than a sharp one. A blunt one is quite likely to skid, and you use more pressure to make the mark, and so on. Keep them sharp, and stop if you're getting tired. I made myself a rule when I was a teenager, when I was stone-carving, that after I had banged the hand holding the chisel, it was time to stop. As you get more skillful, you stop hitting your fingers, which is nice- but the rule is generally a good one for the sake of your picture, if not your digits.
How it Works
In a typical woodcut, the hills take the ink, and the valleys are made deep enough not to print. Usually you'll roll the ink over the top of the sheet of wood. The thinner the layer of ink, the less will go into the valleys. Printing ink tends to be much thicker than the kind of ink you have in a bottle for drawing with. More like Marmite or maybe one of those pates you get in squeezy tubes. I've used etching and litho inks quite happily. Some of my best woodcuts were inked with acrylic screenprinting ink, though that doesn't roll out so nicely. If you're going to print in a dark ink on a lighter background, remember that as you carve away at the wood, you are removing what will be light, and leaving what will be dark. One of my tutors, Simon Packard, did enormous woodcuts of animals. He taught me to go out and draw on the wood, and then cut round my drawing lines. That gives the woodcut a real feeling of life, though you'll be amazed at how much your lines curl around, and what a faff it is to follow them- but it's worth it. You can, of course, draw straight-off with your cutting tools. That's fun, and you'll get a very different look to the print- probably a lot more straight lines. Bear in mind that, unless you are very clever, or have an offset litho press handy, your print will be back-to-front. Not so important if you're doing a bird or a sausage or a flower or something, but if you're doing a street scene or map or anything with writing in it, you may want to think about it.
So your plate is cut, you've rolled the ink on. You position your paper where you want it (an art in itself). If you have a press, print away. If not, use a rounded object that isn't going to make holes in the paper and carefully rub the back of the paper with it. A metal spoon works well but will burn your fingers. I turned myself a nice wooden thing to do this on the pole lathe some years ago. In my mind the printing of it is the hardest thing to get right in the whole process. The paper slithers off or gets buckled. Do start with bits of paper that aren't so precious, and take your time- wash your hands well, etc. Be careful when peeling the paper off not to ruin the whole thing by letting it drag against the inky wood!
Colour in Woodcuts
If you want to use more than one colour, there are various ways to do it. First, you can use coloured paper. Some people add pieces of coloured paper to where they want them in the prints. A coloured background can be used. You can hand-colour the print. You can put different colours on your roller- stripes are easy, if you like stripes. You can ink up very selectively and add the ink with a brush or oilbar or something exactly where you want it. Watch out if you're using an ink that dries quickly! You can get out your fretsaw and cut bits out like a jigsaw, and print the pieces seperately in different colours. You can also mask areas off with paper, or if you're using oil-based inks, you can paint areas with gum arabic and wash it off with water at the end- a bit like batiq.
What I have done is to start with one colour, always bearing in mind what I want in the end, but being prepared to let the thing change my mind. I will print in that colour, and then carve more away, and print in the next colour. If you do this, it's handy to have in mind how many prints you want and do them before it's too late. I'd then carve more away- maybe a little, maybe a lot. If your colours are translucent, they'll overlap and you'll be able to see the colour underneath a bit. If they're opaque, then you'll only see whatever colour is on top. You can do this using the same bit of wood, or multiple pieces of wood. I like using the same one, and the no-going-back nature of that.
That's a little about woodcuts. Linocuts are similar. I've used stone, and you can use cheese or wax or plaster or whatever.
Turning a piece of log into a surface to print from- it definitely keeps you warm! You can see the beautiful grain- the lines- in the wood- that will print to some extent, which gives some of the character real wood gives to woodcuts. The other nice thing about it is you can use it as a mulch in the garden without poisoning things!
Monoprints
This is another type of printmaking I use, and there are 2 ways I go about it.
Both methods start by rolling a very thin layer of ink onto a smooth, hard flat surface, such as a piece of glass.
Method 1- Drawing through the back of the paper: The first method involves putting a thinnish layer of paper on top, and pressing through the back with a stick, finger, pencil, etc to transfer the ink onto the paper. This gives a characteristic fuzzy line, a bit like pencil, but as you're making it with ink, you can do things with it that you couldn't with pencil. If your rolled ink varies in tone, your line also will, and you can be as specific as you like with this. Likewise, you can change colours - mixing them on the sheet of glass, or having different colours rolled out on different pieces of glass. If you don't want to mark the back of the paper, and are using a skewer or finger nail to draw with, then changing colour can mean a more haphazard positioning of images- things aren't all quite where they might be- you can work with that or against that, and personally, I mostly find it a nice effect, so I go with it. If I was aiming for super-accuracy, I wouldn't use this technique- it doesn't seem designed for it.
The shading here comes from having used a little more ink than sometimes, and the very pressure of the weight of paper alone is enough to transfer some ink. You also get a thick, meatier line.
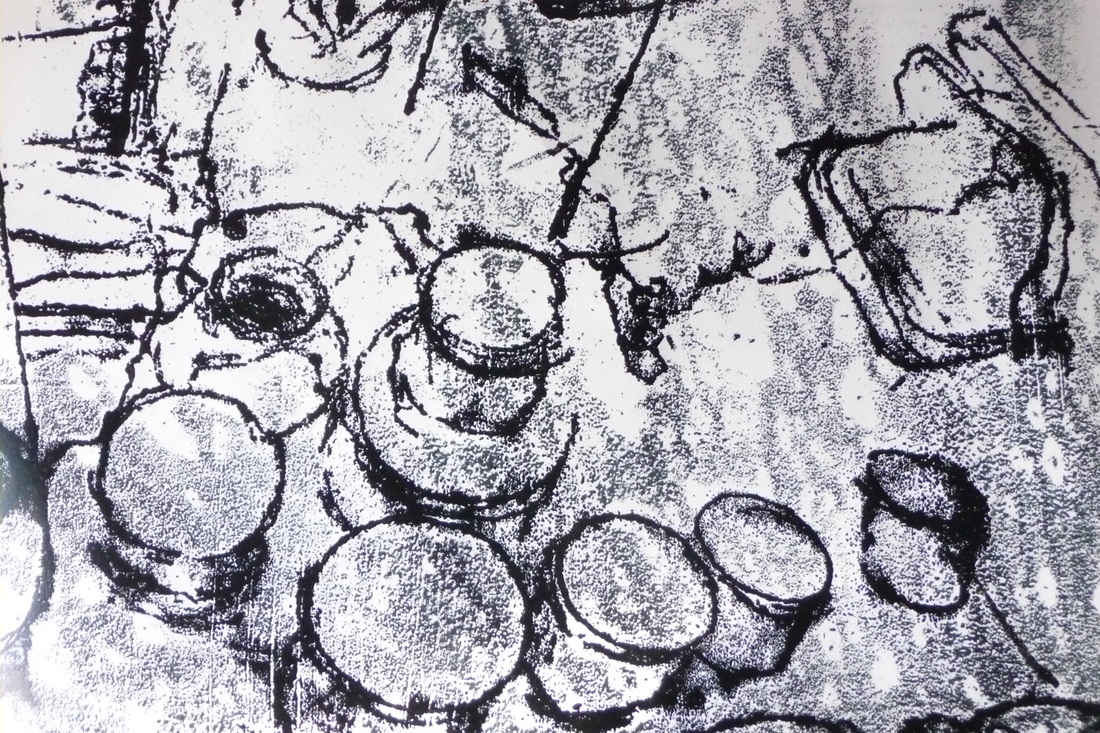
Method 2- Drawing into the ink before adding the paper: The second way is very different- you draw into the rolled ink surface- removing all or some ink- creating areas without it and areas where only a trace remains. The result, in my mind can be similar to a lithograph, or even a silkscreen. As long as your ink isn't going to dry out, you can keep working on this, and, although it's in reverse to how it will print, you can see pretty much what you will get, and very beautiful it can be indeed. Doing this method gives you a lot more control, and makes it easier to line up a second colour, if you want to do that. I like to use old rags- usually ruined white school T-shirts- to remove the ink, but you can use fingernails, brushes, and in fact anything. Corduroy gives a lovely mark. I like the challenge and the different images you see removing areas rather than adding, though of course you can paint the surface if you want to, and ffrom time to time I might.
The number of prints you can get with a Monoprint: As the name implies, a monoprint usually means just the one image, but if like me, you are printing by hand without a press, and not getting every single bit of ink from the glass onto the paper, then if you work like billy-o, you can get a fainter, second image. If I do that, I most normally combine that with a totally new rolling of ink, for another shade or colour, so that it is a unique work- and so that I can experiment with an image I really like. Look at the picture just below, of a girl in a cafe.
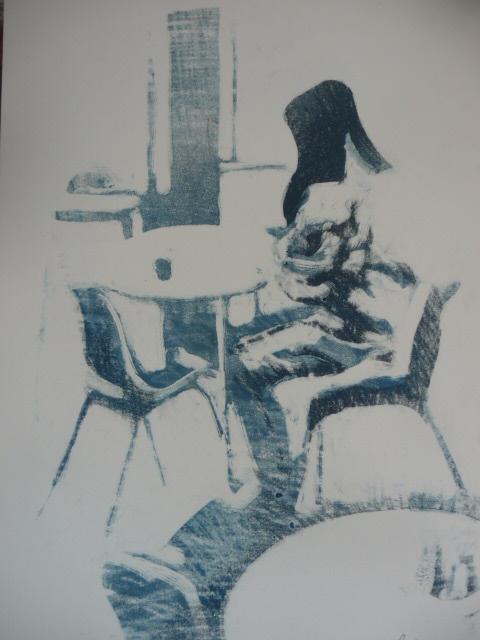
This picture is what I call a 2-layered monoprint, so it has the hard work of the 2nd, fainter printing, plus a darker shade on top.
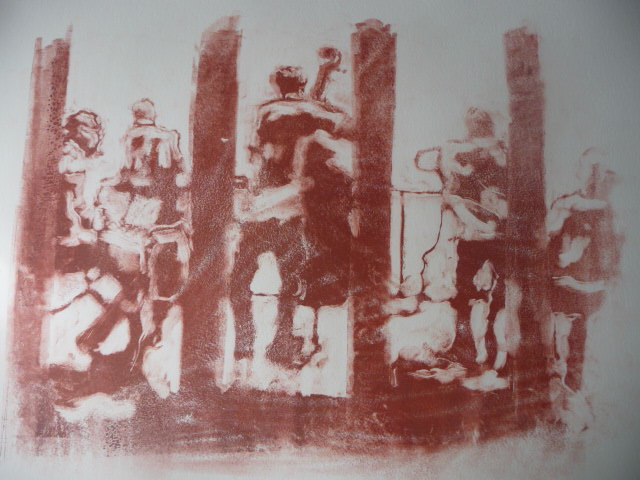
This is a single-layered monoprint- just the one printing, and you can see the marks of my rubbing it from the back, and where in places the ink had begun to dry or was simply rolled more thinly. You can do this deliberately, and I often thin out the edges of a picture to bring the focus into the middle.
